Table of Contents
Since Amazon’s media streaming devices are powered by Fire OS, you can install and run Kodi as a native app. In fact, we’ll teach you how to install any version of Kodi on your Firestick or Fire TV device in the simplest way possible. So, make sure to take a quick look below and decide which method feels the most comfortable, based on your tech skills.
Also, we’d like to say that the following Kodi installation guide applies to the Fire TV Stick Lite, Fire TV Stick (2016 and up), Fire TV Stick 4K, Fire TV (2017 and up), and Fire TV Cube. Now that we have the basics out of our way, here’s what you need to know.
4 Methods to Install Kodi 19 on Any Firestick and Fire TV Device
At the moment, you have four different ways to install Kodi 19 ‘Matrix’ on any Fire TV device, as you can see just below.
- Install Kodi on Firestick or Fire TV Using the Downloader App
- Install Kodi on Firestick or Fire TV Using ES File Explorer
- Install Kodi on Firestick or Fire TV Using ADB Link
- Install Kodi on Firestick or Fire TV Using Apps2Fire
Important Prerequisite – Here’s How to Enable Fire OS’ ‘Developer Options’ Before Installing Kodi
Before you begin following the steps found below, it’s important to instruct your Fire TV Stick (also known as Firestick) to accept third-party applications. If you don’t do this, none of the installation methods from this article will work. So, make sure to do the following:
- Go to Settings on your FireOS device. In other words, navigate to the top of the screen and scroll to the right. The last option you see there is called ‘Settings.’
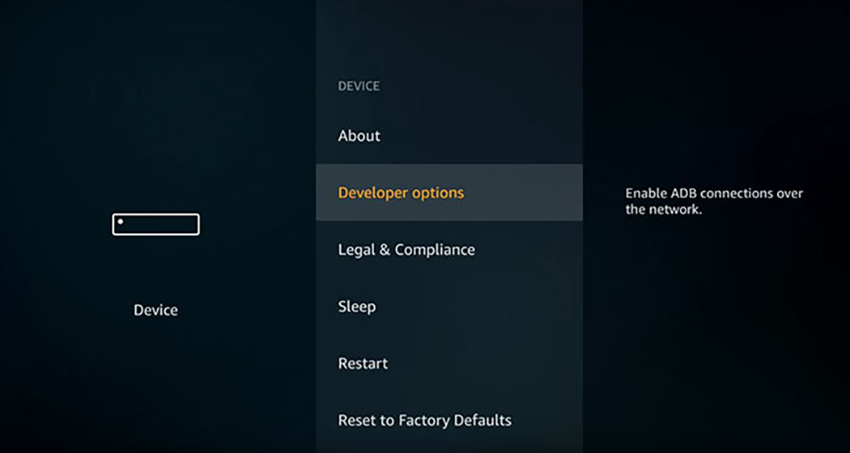
- Next, scroll to the right and pick ‘Device‘ and then select ‘Developer Options.’
- Finally, enable the option that says ‘Apps from Unknown Sources.’ This option needs to be turned on (enabled). You will see a warning but feel free to confirm your decision.
Method 1: Install Kodi on Firestick or Fire TV Using the Downloader App
The Downloader app allows you to download just about any file on your Fire OS device, which comes in handy for getting started with Kodi. So, here’s how to install Kodi 19 on Amazon Fire TV devices via Downloader.
- Navigate to the top of your screen on your Fire TV, and then to the left. You’ll see a search option there. Click on the magnifying glass icon.
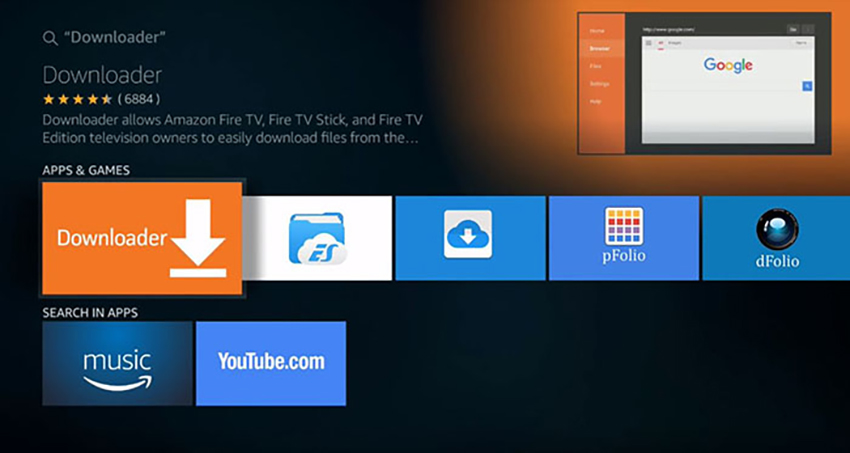
- Now type in ‘Downloader‘ and you’ll see this application’s name under the virtual keyboard present on the screen. Click on the application’s name to access its overview screen.
- Click on the Cloud icon beneath the app’s description. Your Fire TV Stick will now download and install the application. Give it a minute for the application to be installed and then open it.
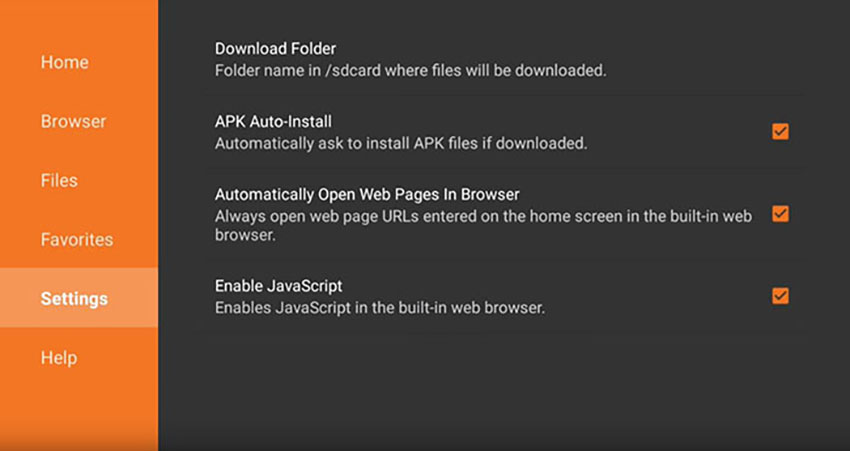
- Navigate to the left-placed sidebar and from there pick ‘Settings.’ Make sure to enable ‘JavaScript’ from there. Highlight this option and click on it. Now return to the app’s home screen.
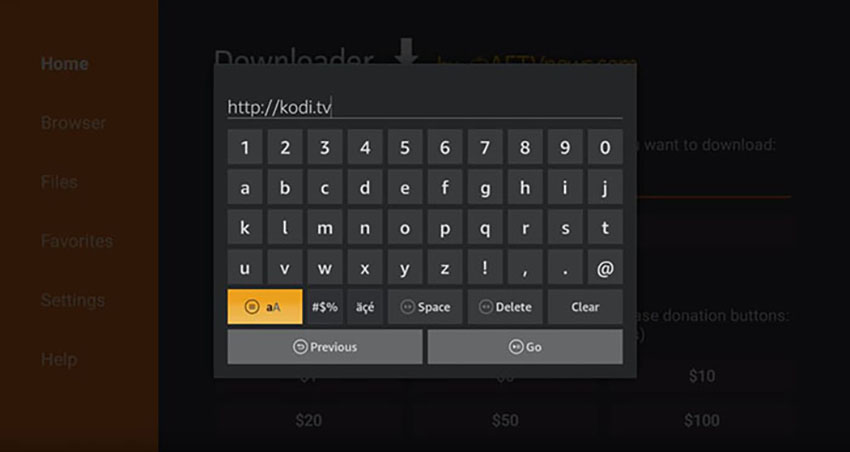
- On the Home Screen, you need to type in Kodi’s URL. Enter ‘https://kodi.tv/download‘ and visit the website using the Downloader app on your Fire TV Stick.
- Then, scroll down until you see the Android logo. Click on it and you’ll be taken to a new page.
- Find the blue-colored button that says ‘ARMV7A (32BIT).’ Wait a couple of seconds. You will see a new window with the progress bar. Wait for the download to be completed.
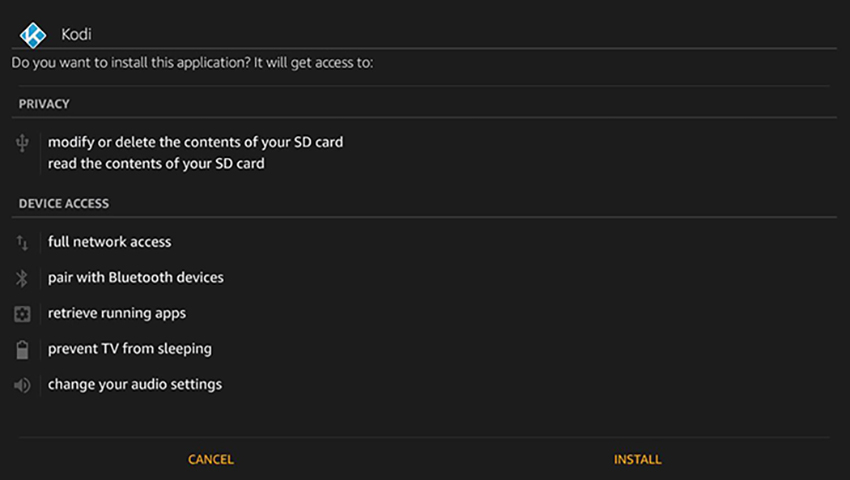
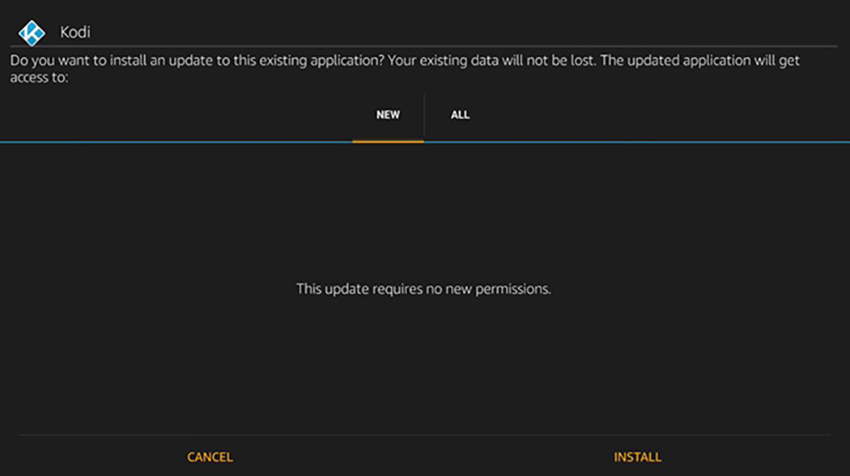
- Once Kodi downloads, you’ll see a new installation window. You’ll recognize it by Kodi’s logo in the top-left corner. Press on ‘Install‘ in the bottom-right corner.
- Once Kodi finishes installing, you’ll see a button that says ‘Open‘ in the bottom-right corner. That is – you have successfuly downloaded and installed Kodi on your Firestick or Fire TV device.
Method 2: Install Kodi on Firestick or Fire TV Using ES File Explorer
This process is somewhat similar to the previously explained installation method. So, here’s how to install Kodi on Amazon Fire TV devices via ES File Explorer.
- Use the search function on your Fire TV stick. This can be done by navigating to the top of the screen and then scrolling all the way left. You’ll see a virtual keyboard once you enter the search.
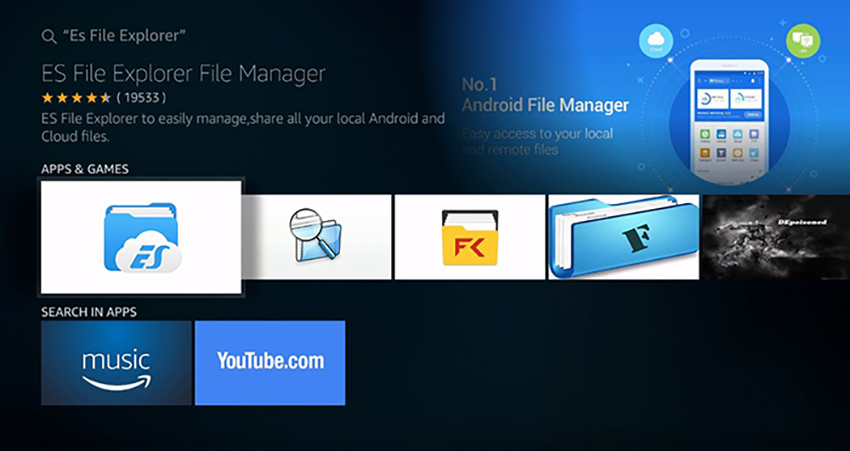
- Type in ‘ES File Explorer.’ As you type in the app’s name, you’ll see a suggestion that says ‘ES File Explorer’ below the virtual keyboard so go ahead and click on it.
- Click on the button that shows a blue-colored folder with ‘ES’ in front of it. Click on it and you’ll enter the app’s overview. Now, click on the Cloud icon below the description to download and install ES File Explorer. Once the app is installed, go ahead and open it.
- When you launch the app, you might see a promotional offer as a pop-up. Feel free to dismiss it.
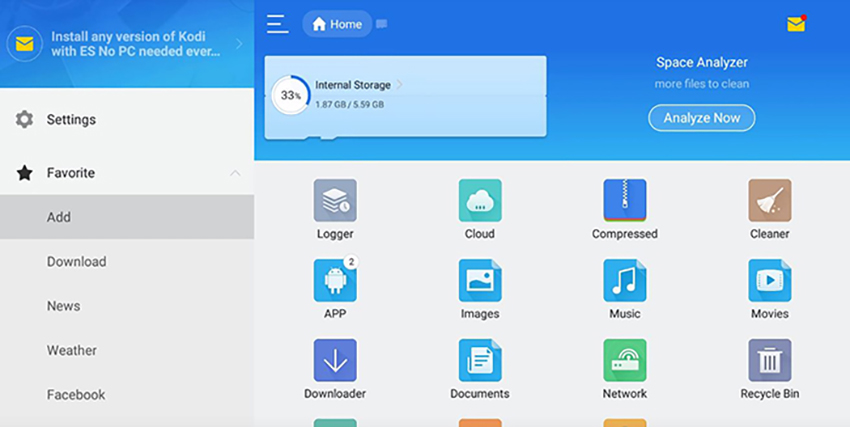
- Now, use your remote to go to the left-placed sidebar and navigate to Favorite > Add. You need to fill out two fields named ‘Path‘ and ‘Name.’ For the path field, type in ‘https://bit.ly/3dJ1X1o.’ Name this newly added path any way you want (you can go with something like ‘KD‘).
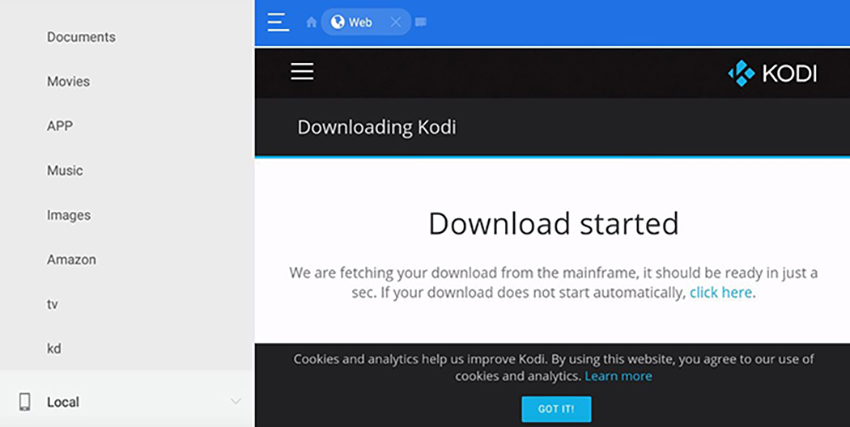
- Return to the previous screen. From the left-placed sidebar, you need to go to Favorite > KD. You should see a Web page on the right with a heading that says ‘Download Started.’
- Return to the sidebar, go down and then all the way right until you find a button that says ‘More.’ You can find it in the bottom-right corner of the screen. A menu will pop up, where you need to pick ‘Open in Browser.’
- You will be asked if you’d like to use the ES Download to open that link. Confirm by clicking on ‘Just Once.’ Also, you might need to click on ‘OK’ two times for Kodi to start downloading.
- Wait for the download to be completed. Once that happens, click on ‘Open File‘ and ‘Install.’
- You’ll now enter the installation screen of Kodi. Pick ‘Install‘ in the bottom-right corner. Once Kodi is installed on your Fire TV, press ‘Open‘ in the bottom-right corner to launch the application. That’s it!
Method 3: Install Kodi on Firestick or Fire TV Using ADB Link
Next, we’ll teach you to use your computer instead of relying on your Fire OS media streamer. So, here’s how to install Kodi on Amazon Fire TV devices via ADB Link.
First, you need to download the latest version of Kodi. Let us show you how to do that.
- Go to the official Kodi’s website.
- Scroll down until you see the Android logo. Click on it and you’ll see a pop-up.
- Finally, click on ‘ARMV7A (32bit).’ Kodi will now download and save to your computer.
Next, we need to download ADB Link.
- Open the following address in your Web browser – http://www.jocala.com.
- Scroll down until you see the ‘Downloads‘ section. This is where you can download different files for different operating systems. At the moment, you can use ADB Link on Windows, Mac, and Linux.
- Wait for the download to end. Finally, install the application on your computer.
Once ADB Link is installed, you can proceed to install Kodi 19 Matrix on your Firestick. Go through the following steps.
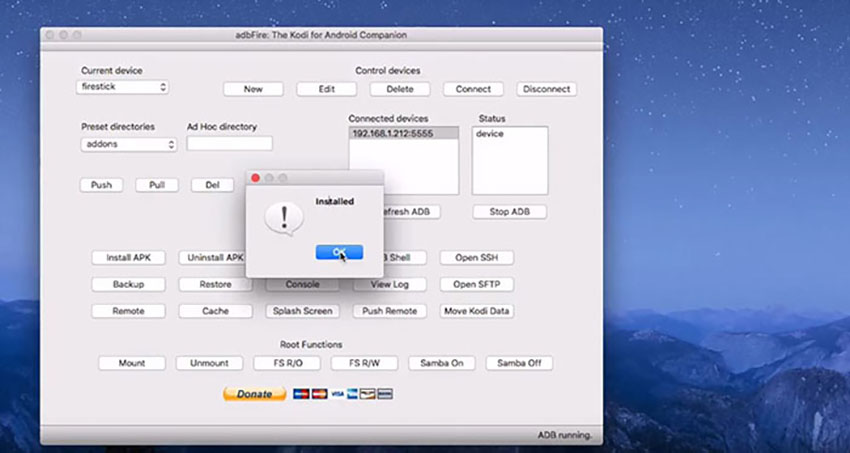
- Launch ADB Link and click on the button that says ‘New.’ A new window will open.
- The first field is named Description. You can go with ‘Firestick.’ The next field is named Address. This is a very important field where you need to enter the IP address of your Fire TV Stick. So, use your Fire TV Stick to navigate to Settings > Device > About > Network. The IP address will be present on the right. Copy that address to ADB Link. Click ‘Save‘ and return to the application.
- Click on ‘Connect‘ (via ADB Link) to connect to your Fire TV Stick. You’ll see once this connection is made by a new IP address in the ‘Connected Devices‘ field. Pick ‘Install APK.’ You will need to navigate to the recently downloaded Kodi installation file.
- You will be now asked whether you’d like to install Kodi on Firestick. Go with ‘Yes.’ That’s it! You can follow the process via the progress bar located at the bottom of the app’s window. Once the process ends, you’ll be notified that Kodi is now installed.
Method 4: Install Kodi on Firestick or Fire TV Using Apps2Fire
Lastly, we’ll teach you how to install Kodi on Amazon Fire TV device using Apps2Fire. With that said, you need to download Kodi and Apps2Fire on your Android smartphone. So, go through the following steps.
- Open the Play Store on your Android smartphone or tablet. In the search field, type in ‘Kodi.’
- Now select this application from the search results.
- Finally, tap on ‘Install‘ and wait until the application downloads and installs on your device.
- Repeat this process for the Apps2Fire app as well.
Once you’ve downloaded Kodi and Apps2Fire on your Android device, it’s time to see how to install Kodi on Firestick.
- The first step is to see your Fire TV Stick’s IP Address. On your Fire TV Stick, go to Settings > Device > About > Network. On the right side of the screen, you’ll see your device’s IP address.
- Now launch the Apps2Fire app on your Android device.
- Go to ‘Setup‘ by scrolling the main menu from the right. This is where you’ll need to enter the IP address of your Fire TV Stick. Enter this information and hit ‘Save.’
- Return to the app’s Home Page or navigate to the ‘Local Apps‘ tab within the app. Tap on Kodi and you’ll be asked whether you’d like to install it. Confirm your decision.
- You will be able to see the entire process on your smartphone’s screen. Apps2Fire will now upload Kodi to your Fire TV Stick and install it. You should see a confirmation that Kodi has been installed.
Looking to Learn More About Kodi?
Hopefully, you’ve managed to install Kodi on your Amazon media streamer. We’ll now take a look at what to do next to make sure you’re using Kodi’s in the best possible way.
This is where we conclude our article on how to install Kodi 19 on Firestick in 2021. We hope that you found this article to be helpful. In case there’s anything you’d like to say, please use the comments section found below. And lastly – thank you for reading!
- CryptoQuant Analyst: Bitcoin Nowhere Near Its Peak – Buckle Up, Hodlers! - December 21, 2024
- Chainalysis: $2.2 Billion Lost to Crypto Hacks in 2024 - December 21, 2024
- Bank of Japan leaves interest rate unchanged: Impact on the macroeconomy and the crypto market - December 20, 2024

