Table of Contents
As our NordVPN review will tell you, this is an incredibly capable VPN service. It doesn’t come as a surprise to know that NordVPN offers obfuscated servers as well, even though that might not be as obvious. This group of specialty servers comes disabled in many cases, so we’ll show you how to enable or disable obfuscated servers in NordVPN. And don’t worry – as this process is incredibly simple.
Follow These Simple Steps to Enable & Disable Obfuscated Servers via NordVPN
This VPN’s obfuscated servers are available across all of its supported platforms. That means you can access them on Windows, macOS, Linux, iOS, and Android. We don’t want to leave anyone out, so we’ll cover all those platforms as follows.
Windows
On Windows, NordVPN’s obfuscated servers are hidden in the application’s settings panel. So, here’s how to get to this type of specialty servers.
- Launch NordVPN and open the ‘Settings‘ menu (using the cogwheel icon).
- Then, navigate to ‘Advanced‘ using the left-placed sidebar.
- On the right, you’ll see an entry labeled ‘Obfuscated Servers (OpenVPN).’ To enable this option, click on the switch on the right-hand side of NordVPN’s interface. Finally, return to NordVPN’s home screen, and you’ll find this group of servers in the bottom-left corner.
macOS
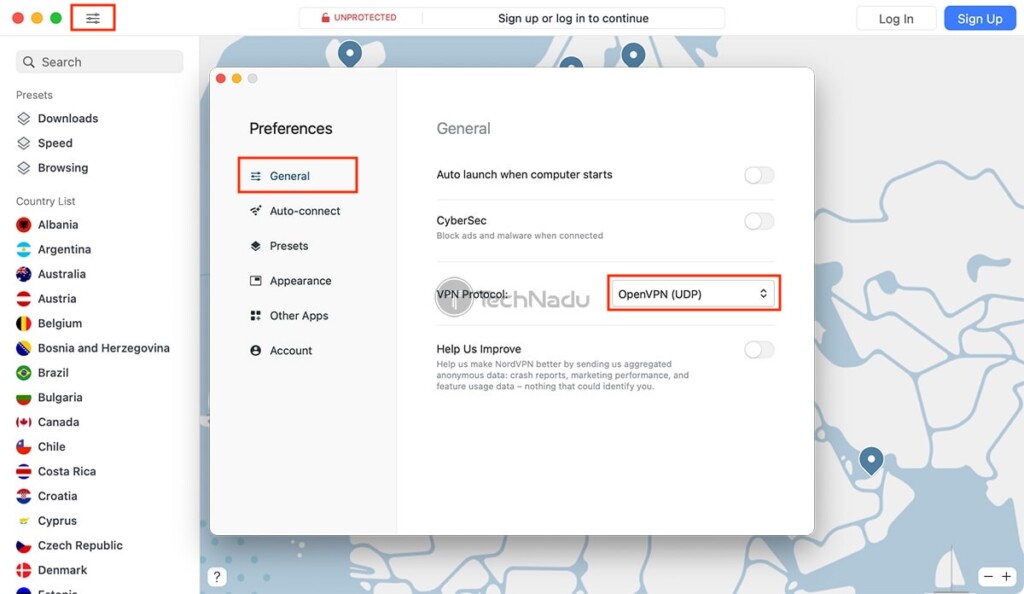
You’ve most probably downloaded NordVPN from the Mac App Store. This version comes with IKEv2 set by default, and we need to change that to OpenVPN to enable obfuscated servers. So, here’s what you need to do.
- Open NordVPN and click on the ‘Preferences‘ icon (in the top-left corner). Alternatively, you can navigate to NordVPN IKE > Preferences using macOS’ menu bar.
- Make sure to click on ‘General‘ using the newly opened ‘Preferences’ window. Then, take a look at the right. You need to change NordVPN’s protocol from IKEv2 to OpenVPN (UDP) or OpenVPN (TCP) – using the ‘VPN Protocol‘ menu.
- Close the ‘Preferences‘ window and return to NordVPN’s main interface. Take a look at the bottom-left corner, and you’ll see a group of (now available) obfuscated servers.
Linux
When it comes to Linux, there’s an easy way to enable or disable obfuscated servers in NordVPN. As you can already guess, this is done using a series of commands, as explained below.
- If you’d like to enable obfuscated servers, you need to use Terminal and the following command: ‘nordvpn set obfuscate on.’ And if you wish to disable this type of server, go with ‘nordvpn set obfuscate off.’ Make sure to press ‘Enter’ to execute and apply your chosen command.
- Then, here’s how to access this group of servers. Simply go with the following command: ‘nordvpn connect Obfuscated_Servers.’ As easy as that!
iOS
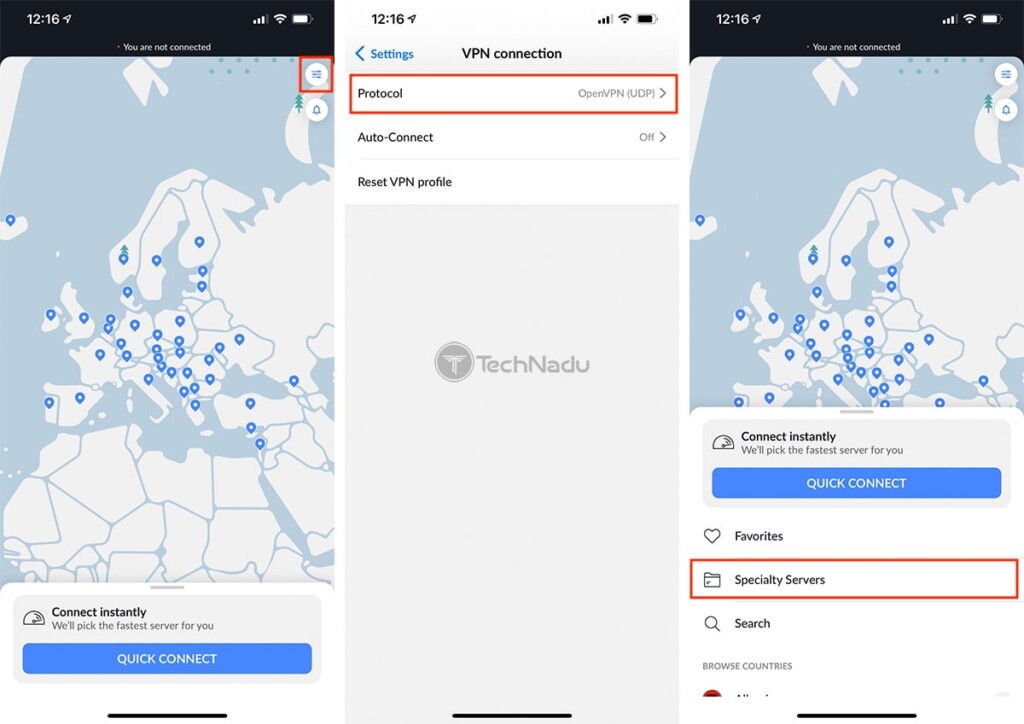
To trick to enabling NordVPN’s obfuscated servers on iOS is to switch to the OpenVPN protocol (this VPN instead uses its proprietary protocol, by default). Go through the following steps.
- Open the NordVPN app and open the ‘Settings‘ menu (via the upper-right corner).
- Then, tap on ‘VPN Connection‘ and then on ‘Protocol,’ which will show you a list of protocols compatible with your device. You need to tap on ‘OpenVPN (UDP)‘ or ‘OpenVPN (TCP).’ Then, feel free to return to NordVPN’s home page.
- To connect to obfuscated servers, make sure to navigate to ‘Speciality Servers‘ using the app’s main screen. This is where you’ll see a group labeled ‘Obfuscated Servers.’ Tapping on that will connect you to the nearest available server. If you tap on the ‘three dots’ icon, you’ll get to pick a server manually. That’s it!
Android
Let’s not forget our readers who are using NordVPN on Android. Here are the steps to enable or disable obfuscated servers in NordVPN on that mobile platform.
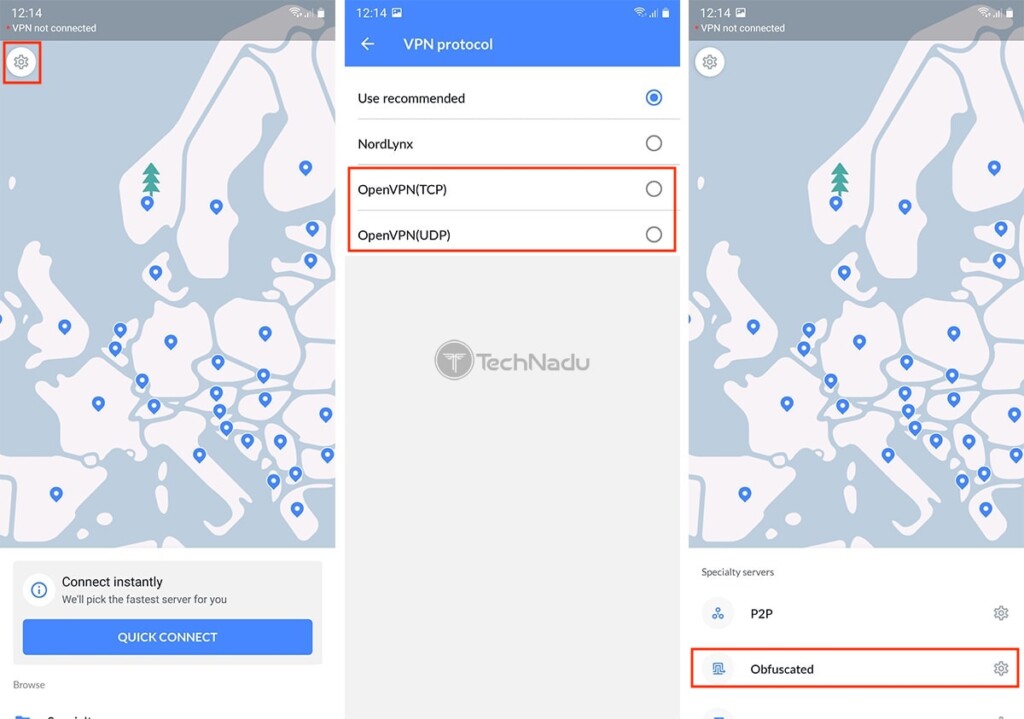
- You need to make sure that you’re using the OpenVPN protocol. So, open NordVPN and visit its ‘Settings‘ menu (using the upper-left corner).
- Then, navigate to ‘VPN Protocol.’ Use this option to reveal the available protocols and tap on ‘OpenVPN (TCP)‘ or ‘OpenVPN (UDP).’ Then, return to NordVPN’s main screen.
- You will find obfuscated servers under the ‘Browse‘ tab in the ‘Specialty Servers‘ segment. Tap on that segment and then tap on ‘Specialty Servers’ to connect.
What Else Should You Know About NordVPN’s Obfuscated Servers?
While we have your attention, we’d like to expand this topic a bit. Understanding the basics of NordVPN’s obfuscated servers will help you use them in the right way, as well as for the right purpose. So, keep on reading.
What Are ‘Obfuscated Servers?’ How Do They Work?
In case you didn’t know, your ISP can still see that you’re using a VPN – even though it can’t see the contents of your secure VPN tunnel (which means that your privacy is guaranteed). That is precisely where obfuscated servers come into play, as they change the way your Internet traffic is rerouted.
In other words, obfuscated servers change your data packets. In turn, your ISP won’t have a way of knowing whether you use a VPN in the first place. Thanks to this double encryption, any VPN metadata will be hidden and concealed. As such, these servers are great for unblocking the Web in countries with firewall-based restrictions, as your Internet traffic will look like regular HTTPS traffic.
Who Should Use NordVPN’s Obfuscated Servers?
Considering that obfuscated servers bring another layer of encryption, they have certain drawbacks. The most prominent of those is a Web connection speed loss due to double encryption.
With that said, we recommend using NordVPN’s obfuscated servers only if you face rigorous Internet roadblocks. Also, if it’s imperative to keep your privacy safe and protected on the Web, it’s a good idea to stick to these specialty servers.
Those would be all the ways to enable or disable obfuscated servers in NordVPN. In case you have any troubles or questions, know that you can count on us. Just make sure to post your comment below. And lastly, thank you for reading!
- Is This the End of the Crypto Bull Market? - February 26, 2025
- SEC vs. Ripple Lawsuit Takes a Shocking New Turn - February 25, 2025
- Deep Dive: Why U.S. National Debt Has Reached Unprecedented Levels - February 25, 2025


