Today we will see how to put Harvester Chia into operation. So far, we’ve started farming Chia coin on a single computer, and it can take a while to fill your hard drives with plots. While it is technically possible to assemble additional computers and then install Chia on those ones, there is a better way. The better way is the harvester Chia.
The idea is simple: farming is easier with a single Chia node on the network that handles all issues and updates. Although Chia’s network traffic doesn’t use a lot of bandwidth, it doesn’t make sense to have multiple computers (especially for large farms) trying to sync them all.
Ideally, select the fastest computer for the entire Chia node, and then configure all other computers on the network as harvesters. They will be routed through the master node and will not require synchronization and all the extra things. You will have to make do with the command line. Fortunately, it’s not particularly difficult.
First, put your Chia primary node into operation, nothing needs to change here. Synchronizing with the blockchain takes a while, but you can start generating plots before the process is complete. For secondary harvester nodes, start by installing Chia in the same way, but when you see the main interface asking you to create a new key or import from mnemonics, simply quit the program and then open a command prompt.
You will need several things. First, you need the CA (Certification Authority) folder from the master node. You can share it over a network, although this may not necessarily be the safest way to do it – but if you run a farm from your home, it probably won’t matter. You will also need to know the name and IP address of the host computer, so let’s start here. Open the “About” screen on your computer (Win + X, then Y in Windows 10), open the Settings tab, click System and then About.
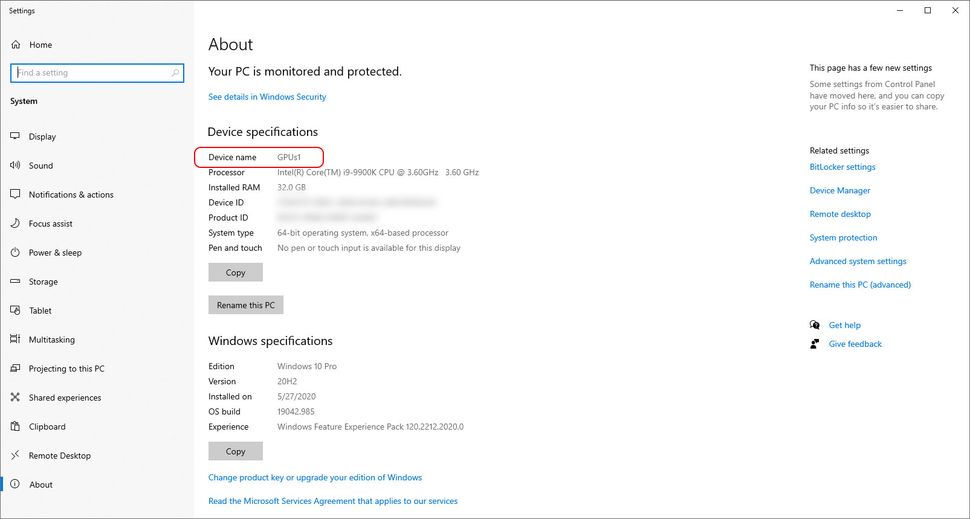
By default, if you have never named your computer, it will be difficult to remember, such as “Desktop-AH81JFG” or whatever. You should now give it your own name, such as “ChiaFarmer”. You will need to restart. While we’re here, you should have a host connected to an Ethernet network. It’s not that you can’t use Wi-Fi, but latency is usually at least a few ms lower for cable connections.
Back to that CA, let’s share the folder. On the host computer, open the dialog box (Win + R), and then type “%USERPROFILE%\.chia\mainnet\config\ssl“and you will get the required Chia configuration folder.

Right-click the CA folder, click Properties, and then click the Sharing tab. The “Advanced Sharing” dialog box, then check the Share this folder option and click Permissions. Remove “Everyone” from the list, click Add, type “Authenticated Users“, press the Check Name button, and then press the OK. Only computers that know the user account and password for your computer can now access your shared folder.
We are now ready to set up secondary computers. Open a command prompt (Win + R, type “cmd” and press Enter) or a PowerShell command prompt (Win + X, then press “I“). We need to change the main Chia folder on this computer, so enter:
[Command Prompt:] cd “%LOCALAPPDATA%\chia-blockchain\app-1.1.5\resources\app.asar.unpacked\daemon”
[PowerShell:] cd “$ENV:LOCALAPPDATA\chia-blockchain\app-1.1.5\resources\app.asar.unpacked\daemon”
If you are using a newer version of Chia (now 1.1.6), you will need to change part of the “app-1.1.5” command. You are now in the directory where we can configure the harvester. Now we need to know the IP address of the host computer, so enter:
ping -4 [Main PC Name]
You should see the IP address, such as:
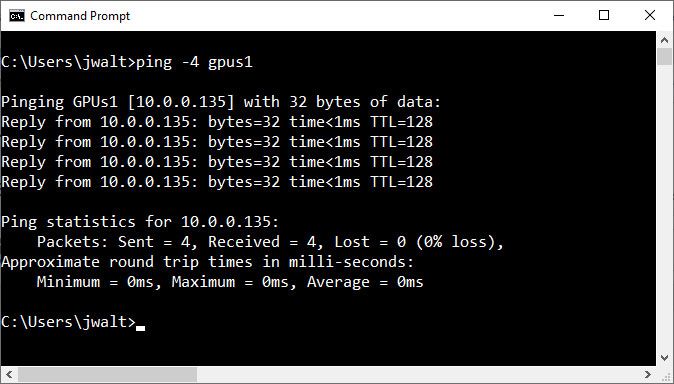
Example computer IP address is 10.0.0.135. Your may be similar, or it may be 192.168.1.xxx, or it may be something completely different. Whatever this number is, it should be consistent for all future computers you configure – if your home DHCP server (your router or cable or DSL modem) regularly assigns IP addresses, you should look at configuring a static IP address for the main PC .
Now let’s prepare the harvester Chia. Type:
.\chia.exe stop all -d
This will ensure that Chia will not run (it should not be). You can also specify where plotss are scanned on this node by entering.
.\chia.exe plots show
Simply enter “chia” or “.\chia.exe” will also show a list of options and you can check the parameters by appending -h (eg “.\chia.exe plots -h”). Another potentially useful command: “.\chia.exe plots check” will test all plots, tell you how many there are and make sure they are all valid. Warning: If you have a lot of plots, it will take some time.
And here’s the important part, configuring the harvester node options.
.\chia.exe init -c [Your CA folder location]

In example, you can see that he imported CA configuration files from the host computer (Ryzen5900X) to the local computer. We’re almost done. Now enter:
.\chia.exe configure –set-farmer-peer [Main PC IP Address]:8447
“8447” specifies the port to use, which is 8447 by default – you can change it, but we don’t solve it here. We’re almost done. One last command:
.\chia.exe start harvester -r

This will start your secondary computer as a hartvester node and the “-r” character is for restart (just in case). When done, go to the Chia app on your host computer and look at the Farm screen and you should see your active harvesters. About every ten seconds, the Chia network should issue a new prompt, to which your main node can now respond, along with a harvester checking all connected plots.
How to run Harvester Chia automatically
You may want to schedule the above harvester Chia to start automatically when you start your computer. This is not too difficult with Windows Task Scheduler. The following screen will welcome you (resize and resize as needed to see everything).

This may seem a little scary, but you can ignore everything there is. Scroll right and click Create Task… to add a new scheduled item.
On the General tab, give your task a name, something catchy like “Start Harvester Chia.” You can also add a description if you want, but it’s not required. Check the option for running whether the user is logged in or not, and configure it for Windows 10. Next, on the Triggers tab add a new trigger, set it to “At startup.”
The Actions tab contains the most important parts, such as what we actually want to run. Click the New button, enter “powershell.exe” in the Program / script field and enter the following in the Add arguments field:
-executionpolicy bypass -NonInteractive -NoExit -command “C:\Users\[Username]\AppData\Local\chia-blockchain\app-1.1.5\resources\app.asar.unpacked\daemon\chia.exe start harvester”
If you are using a different (newer) version of Chia, you will need to change the “app-1.1.5” section as needed.
Finally, on the Conditions tab uncheck the “Start the task only if the computer is on AC power” (unless you’re using a laptop and you want it to not run while on battery power, maybe). You can also check the “Start only if the following network connection is available” set to “Any connection.” Then on the Settings tab, check the “Run task as soon as possible after a scheduled start is missed” and also uncheck the “Stop the task if it runs longer than:” box (because we don’t want it to stop, ever).
Click OK and you will be prompted for user credentials to run the job even if you are not logged in. If you want to test things now, go ahead and restart your harvester computer. Assuming you have at least a few plots on it, once it starts, you should be able to go to the host computer and view its items on the Farm tab (currently, the only real indicator is the number of plots on each harvester Chia).
What if you want to add more plotss to the harvester otherwise by doing a graphical user interface? Open PowerShell (again if you closed it) and navigate to the Chia folder.
cd $ENV:LOCALAPPDATA\chia-blockchain\app-1.1.5\resources\app.asar.unpacked\daemon\
Then enter:
.\chia.exe plots create -n [Number of Plots] -f [Your Farmer Key] -p [Your Pool Key] -t [SSD Temp Folder] -d [Final HDD Folder]
The keys come from the host computer, so you will need to get the actual codes by typing “.\chia.exe keys show” from that computer.
If you open Task Manager, you should see a lot of CPU, RAM and SSD activity. Keep the PowerShell command windows open, because they’re plotting right now.


