Chia mining: how to join the pool – Pooling protocol
5 min readTable of Contents
Due to the growing network space (netspace), obtaining Chia blocks is a very difficult task and can take months for users with multiple hard drives to generate Chia. Pooling allows you to earn regularly in small amounts.
The Pooling protocol allows you to assign plots to “Plot NFT”, which is something like a smart contract on a blockchain that you control, in which you can set the currently assigned pool. You can also change the pool to which the NFT Plot is assigned at any time.
Thanks to the Pooling protocol, your farmer will communicate with a specific pool server and will often send proof of space to that pool to show how many TB of plots you have. Therefore, the pool can monitor the space of each of its members (farmers) and whenever one of the members wins the block, it can distribute the rewards in proportion to the amount of space to which each farmer has contributed.
That’s why pooling is like lottery insurance: all members participate in the Chia “lottery,” and whenever one member wins, they receive a reward and distribute it to all members, minus a small fee. 1.75 XCH is split between pool members and 0.25 XCH goes directly to the farmer who won the block. As a block winner, you would also earn a small chunk of this 1.75 based on how much space you have and how the pool decides to split the prizes.
How to get started with Pooling Protocol
Old plots that were created during solo farming cannot be used. You will need to create new plots to participate in the pool. However, you can farm both solo and pool on the same computer.
Step 1: Synchronize your entire node and wallet
To get started, you need to upgrade to Chia 1.2 (download HERE) and synchronize the entire Chia node and wallet. The status of the entire node should have the status “Synced” and the wallet card at the top right should also have Synced.

IMPORTANT: If you use the same key (24 words) on more than one computer, you should upgrade both computers to version 1.2+ before creating an NFT Fence. If you have already created an NFT Plot and in a version older than 1.2, you will not see this NFT Plot. This can be fixed by shutting down the application and deleting the folder ~/.chia/wallet/db and all the files in it.
Step 2: You need some XCH
To start pooling, you first need a small amount of Chia in your wallet. You can ask your friends to send you some mojos (1 mojo is 0.000000000001 XCH) or get them for example using https://faucet.chia.net/. You can use the address on the Wallet page and you can also create new receiving addresses. Any of the receiving addresses can be used, they are all part of the same wallet.
You can find a list of faucets in our Chia mining section.
Step 3: Create an NFT Plot
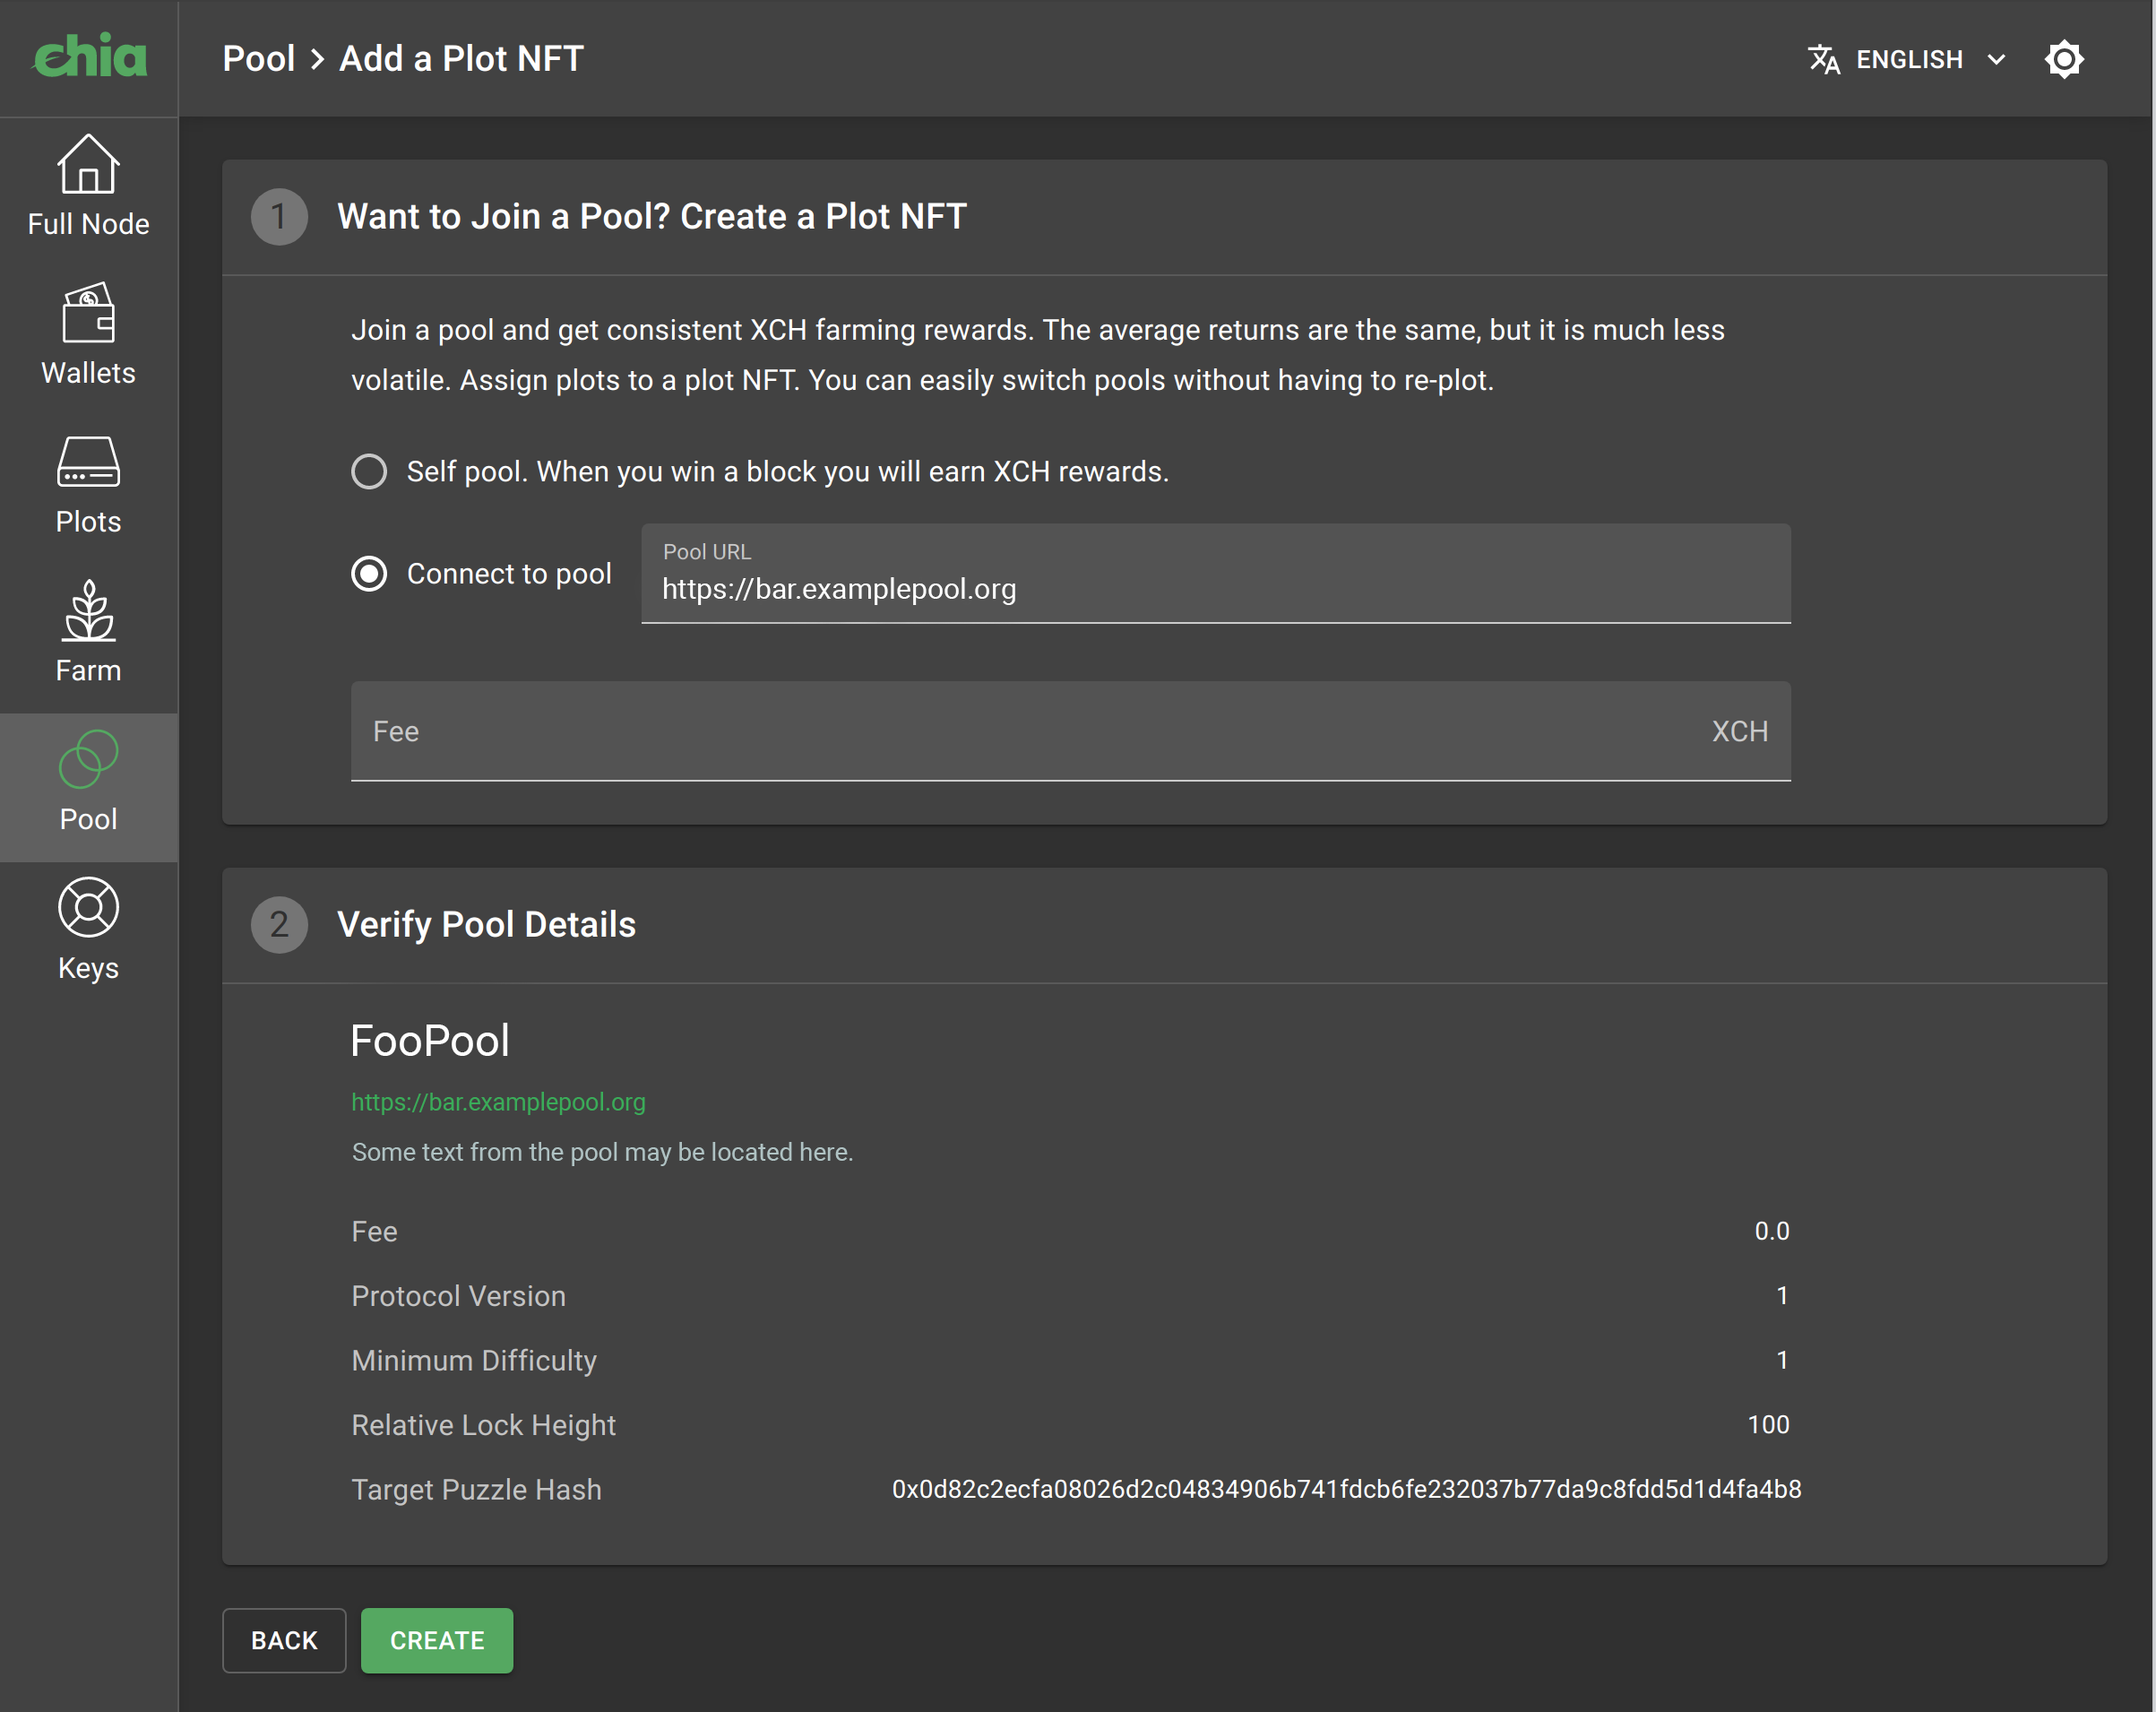
Once you have an XCH in your wallet, go to the card Pool and click on “Add a Plot NFT“. You now have two options:
- Self-pooling: this NFT Plot will not be connected to any pools and 1.75 XCH will go directly to your wallet. From the command line: chia plotnft create -s local
- Join the pool: join the pool and start farming as soon as you create some Plotss. From the command line: chia plotnft create -s pool -u https://bar.examplepool.org
You can find a list of pools in our Chia mining section.
Note that even if you select option 1, you can join the pool later and change it at any time. If you decide to join the pool, enter the URL (must start with https: //) and look at the description. If you agree, create an NFT Plot and wait for its confirmation (click only once). It may take a few minutes for this to confirm and appear on the Pool tab. You only need 1 NFT Plot.
Step 4: Add plots
You can now start creating plots for this NFT Plot, which means that these plots will “pooling” and can earn rewards more often. Click on the 3 dots in the NFT Plot for which you want to create plots and select “Add a Plot“. This selects this NFT Plot on the plot screen. If you do not select anything or select “None”, an OG (solo) plot will be created.
If you are using a command line interface or a third-party plotter, hover your mouse over the question mark on the NFT Plot page and copy the address of the pool. This is the address you must use when plotting by entering the -c argument. Note: DO NOT use the -p argument, only -c, when plotting using the command line interface for pooling. You can still specify the -f argument as before, and the other arguments have not changed.
Step 5: Manage your NFT Plot
You should see your plots in the NFT Plot interface. The status should be “Pooling“. From here you can see your difficulty, the number of points earned and how many points the pool thinks you have (balance of points).
The difficulty is a value that is different for each NFT Plot, which determines how difficult it is to find evidence for these plots. The values are set automatically so that your plots find proof more often (every few minutes or hours). Each piece of proof found will give you difficulty points. Farmers who have many plots will have a higher difficulty to minimize disk usage.
Points are a way to calculate how much proofs your plots have found. Each k32 plot scores an average of 10 points per day, regardless of difficulty. Points are not in Chia (XCH). Points are just a value that reflects how much you have farmed. Take it as an accounting tool. It is the pool’s responsibility to regularly reward you with XCH based on how many points you earn, and then reset the points back to 0.
To change the pool, click on the “Change Pool“And enter a new pool URL. When changing pools, you will wait for some time, it can be from a few minutes to an hour. You can change pools as often as you like and no fee or registration is required.
You should make sure that your points found in the last 24 hours are accurate. You should get around 10 points per day on k32, so if you have 100 k32 fences, you should get around 1000 points per day. Make sure your points balance goes up. Once you get paid, the points balance is reset. Points come at random times because the search for evidence is still random. Therefore, expect great variability and good and bad times.

Step 6: Wait for payouts
You are now done. If your points balance increases, you are “pooling” properly and you should check your pool to see how often payouts are made and, if necessary, log in to the pool interface.

